Engineering Technology, XMUT 2024
Assignment 1 (Understanding and Designing FSM Controllers)

Due 31 March , 19 pm (Xiamen Time)
 Note: This assignment is individual. You must not work in groups.
Resources and links:
To Submit:
-
assignment1.pdf (Your answers must be submitted online in one PDF file)
1. An Arduino toy controller.
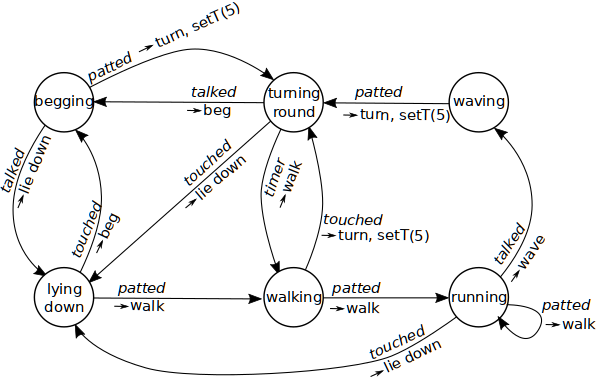
The diagram shows an FSM of an Arduino sketch for an interactive toy.

The toy has
sensors to detect when
- it is patted
- its nose is touched by something
- it is talked to
- its timer expires
The Arduino sketch performs
actions to initiate several different behaviours on the toy:
- walk (speeds up if already walking)
- sit up and beg
- left one leg and wave
- lie down and do nothing
- turn round and round
- setTimer(5): set timer for 5 seconds
(a) If the Arduino sketch starts in the state
lying down and receives the following sequence of sensor values, what sequence of actions will the Arduino sketch perform on the toy, and what state will it end in?
- touched, talked, patted, touched, talked, patted, timer, patted, patted
(b) If the Arduino sketch is in the state
begging and receives the following sequence of sensor values, show the sequence of states that the Arduino sketch will go through.
- patted talked talked touched talked patted patted touched patted touched touched patted.
(c) Suppose the toy is currently
waving. Give two different sequences of things a child could do to the toy to make it start walking.
2. Controller for a Pipe Robot
Design an FSM of Arduino sketch for a robot pipe inspector. The robot can be put inside a drainpipe to inspect the pipe and to clean it out. It can also take pictures of the inside of the pipe.
The Arduino sketch has five actions:
- move forward along the pipe
- reverse backwards along the pipe,
- cut through obstacles or blockages with its cutter blade.
- take a picture.
- setTimer(2 seconds)
The robot has four sensors
- obstacle, which detects a blockage in the front of the robot
- free, which detects when a blockage is removed
- sidePipe, which detects pipes from the side
- return, a signal from the user that the robot should return to the start.
- timerExpired
The robot always starts moving forward in the pipe.
If it encounters an
obstacle while moving forward, it will take a picture and attempt to cut through the obstacle for 2 seconds. If it becomes
free during those 2 seconds, it will resume moving forward. If after 2 seconds, it is not free, it will start moving backwards, and then, after 2 seconds, it will start moving forward again.
If at any point it receives a
return signal, it will start moving backwards.
While the robot moves backwards along the pipe to return to the start, it will take a picture every time it senses a
side pipe.
Hints:
- Your diagram will need at least four states and at least 8 arrows.
- Remember that each arrow between states should have exactly one sensor and one or more actions.
- Think of all the things that could happen after the robot is put into the pipe and make sure that the diagram has all the paths.
3. Blender controller
Draw the design of an event-based FSM of Arduino sketch for a hand-held blender. The blender has a motor, two buttons ---
up and
down --- and a timer.
The blender should have three modes:
off,
half, and
full.
Pressing the up button should change the blender from off to half mode or from half mode to full mode. Pressing the down button should do the opposite.
When the blender is in half mode, the motor should be set to low speed.
When the blender changes to full mode, the motor should be set to high speed, except that the motor will overheat if it is on high speed for too long. Therefore, when the blender is in full mode, the motor should cycle between being on high speed for 120 seconds and being on low speed for 20 seconds.
The blender sends three sensor signals to the Arduino:
- up, (the user pressed the up button),
- down, (the user pressed the down button) and
- timerExpired.
The Arduino can perform four actions on the blender:
- off
- low speed
- high speed, and
- setTimer(n) (where n is the number of seconds)
Note: This assignment is individual. You must not work in groups.
 The toy has sensors to detect when