Engineering Technology, XMUT 2024
Lab 3 “Traffic Light”

Due 7 April , 19 pm (Xiamen Time)
 Note: You must submit your files AND you must present your Traffic Light project to co-teachers or tutors in the lab.
 This is a group lab.
 You need to use a real Arduino to test your codes.
Resources and links
To Submit
Your group must present your project to the lecturer,
AND you must submit
-
TrafficLight.ino (the Arduino sketch)
-
TrafficLight.jpg (a picture of your breadboard)
 Make sure your files have the right names.
 Note: It is always important to make sure that your circuit is not powered while you are making changes to it. You can easily make incorrect connections, potentially damaging the components. So before you begin, make sure that the Arduino is unplugged from your computer or an external power supply.
The Traffic Lights Controller
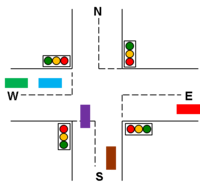
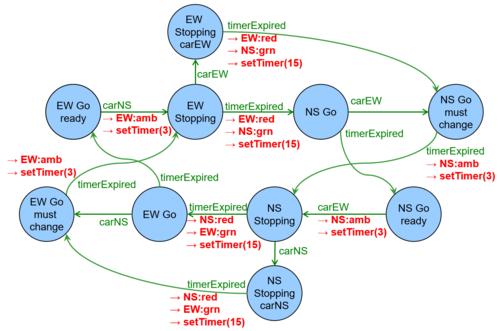
For this lab, you must turn a diagram of a FSM for controlling traffic lights into an Arduino sketch that will control traffic lights at a simple intersection.

Stage 1: Hardware Setup (40%)
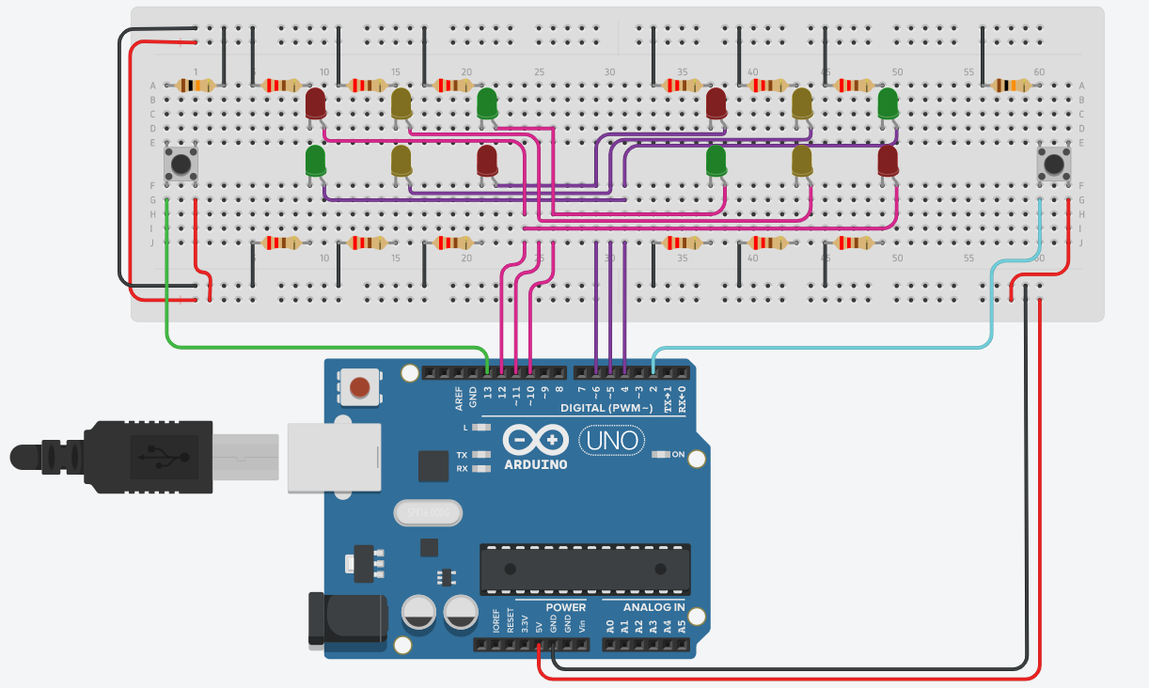
Your hardware should have four sets of "traffic lights". Each set as a red, yellow, and green light.
The required components are as follows:
- One or two breadboards
- Four red LEDs
- Four yellow LEDs
- Four green LEDs
- Twelve 220Ω resistors for the LEDs
- Two pushbutton switches
- Two 10kΩ pull-up resistors for the pushbutton switches

Implement your design on the breadboard and connect it to the Arduino.
 Note:
Note: you must follow the colour coding to design your circuit.

Stage 2: Implementation (40%)

Turn the FSM diagram into an Arduino sketch. Then program the Arduino.
Your sketch must be appropriately commented.
We have given you a template for the Arduino sketch. You must:
- complete the
loop() function so that it implements the transitions in the FSM diagram.
- complete the
turnNSred() , turnNSamber() , turnNSgreen() functions.
-
turnNSred function makes the N-S lights be red
-
turnNSamber function makes the N-S lights be yellow
-
turnNSgreen function makes the N-S lights be green

You can simulate the sensor signal from a car coming up to the intersection by pressing a pushbutton switch. Each time a sensor signal is sent to the Arduino, the Arduino should respond appropriately, depending on what state it is in, and following the correct transition in your FSM design.
The Arduino sketch should have a big conditional statement that
- checks the state it is currently in (stored in the
state variable), then
- checks the sensors (stored in the
carNS, carEW, and timerExpired variables) that matter in that state, then
- does the right actions on the LEDs then
- changes the state to the new state.
For each transition in your FSM design, you will have one clause in your big conditional statement.
The possible sensor values are:
-
carEW a car passed over the sensor on the east-west road
-
carNS a car passed over the sensor on the north-south road
-
timerExpired the timer has expired.
The possible functions that your
loop() function can call to control the intersection are:
-
turnEWred() set east-west lights to red
-
turnEWamber() set east-west lights to yellow
-
turnEWgreen() set east-west lights to green
-
turnNSred() set north-south lights to red
-
turnNSamber() set north-south lights to yellow
-
turnNSgreen() set north-south lights to green
-
restartTimer(1000) restart the timer for 1000 milliseconds
 Hints:
- Try to keep the structure of your code matching the structure of your design. You will lose marks if the markers can't see the relation between your design and your implementation.
- Start simple, getting just the basic behaviour of the traffic light.
Stage 3 [Challenge]: improve your design (10%)

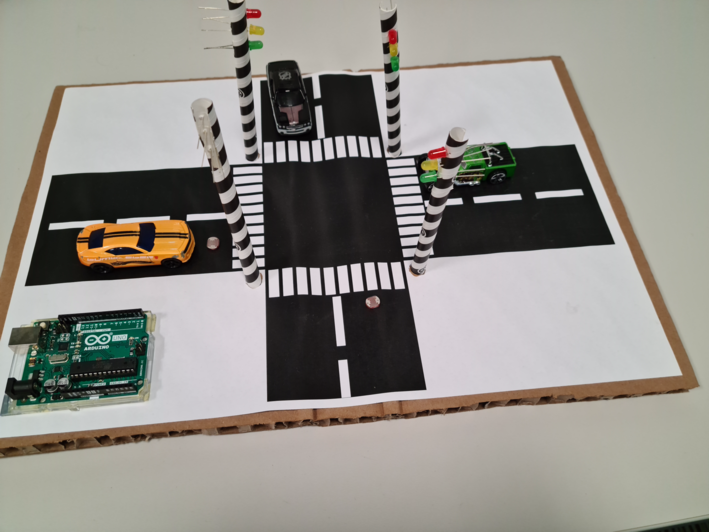
Make a physical model of an intersection with lights and cars. (You can use cardboard, straws, chopsticks, or whatever you like).
For extra bonus marks, use light sensors that the cars can drive over instead of pushbuttons.

Demonstration (10%)

All the group members must contribute to presenting your project to your co-teachers or tutors in the lab.
Note: You must submit your files AND you must present your Traffic Light project to co-teachers or tutors in the lab.
This is a group lab.
You need to use a real Arduino to test your codes.
 Make sure your files have the right names.
Note: It is always important to make sure that your circuit is not powered while you are making changes to it. You can easily make incorrect connections, potentially damaging the components. So before you begin, make sure that the Arduino is unplugged from your computer or an external power supply.


 You can simulate the sensor signal from a car coming up to the intersection by pressing a pushbutton switch. Each time a sensor signal is sent to the Arduino, the Arduino should respond appropriately, depending on what state it is in, and following the correct transition in your FSM design.
The Arduino sketch should have a big conditional statement that
