Engineering Technology, XMUT 2023
Lab 4 “Arduino and ultrasonic sensor: Radar”

Due 21 April , 19 pm (Xiamen Time)
 Note: You must submit your files AND you must present your radar project to co-teachers or tutors in the lab.
 This is a group lab.
 You need to use a real Arduino to test your codes.
Resources and links
To Submit
Your group must present your project to the lecturer,
AND you must submit
-
radar.ino (the Arduino sketch)
-
radar.jpg (a picture of your breadboard)
 Make sure your files have the right names.
 Note: It is always important to make sure that your circuit is not powered while making changes to it. You can easily make incorrect connections, potentially damaging the components. So before you begin, make sure that the Arduino is unplugged from your computer or an external power supply.
The Radar Controller
For this lab, you are making a radar system using Arduino.
The required components are as follows:
- 1 x breadboard
- 1 x ULTRASONIC Sensor
- Up to 3 LEDs
- 1 x 220Ω resistor for each LED
- 1 x servo motor
Core (Easy):
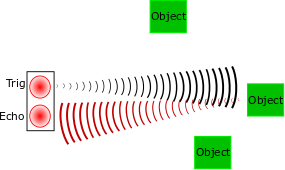
The ultrasonic sensor is used to measure the distance to the object.

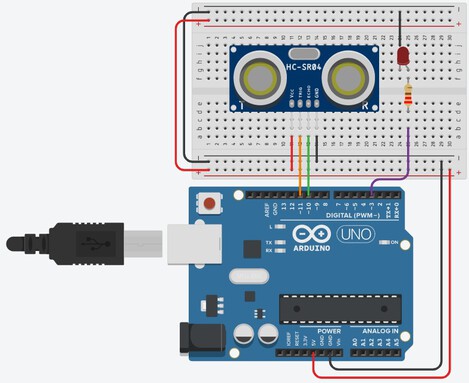
Follow the circuit diagram and make the connections as shown in the image given below.

 Note:
Note: you must follow the colour coding to design your circuit.
The Ultrasonic sensor has four terminals - +5V, Trigger, Echo, and GND connected as follows:
- Connect the +5V pin to +5v on your Arduino board.
- Connect Trigger to digital pin 11 on your Arduino board.
- Connect Echo to digital pin 10 on your Arduino board.
- Connect GND with GND on Arduino.

Create a new sketch (
radar.ino) to calculate the distance (in cm) measured by the Ultrasonic distance sensor.
- Display the distance through the serial port. (This lets you check that your sketch is working.)
- Now connect an LED to the Arduino, and display the distance measured by the brightness of the LED.
- When an object is within the range between 2 cm and 4m, the Arduino should light up the LED.
- The LED should completely be on if the object is 2cm away from the radar.
- The LED should completely be off if the object is more than 4m away from the radar,
- As the object gets closer, the LED should be brighter.
- As the object gets further away, the LED should be dimmer.
 Hint:
Hint: You should connect the LED to the PWM pin on the Arduino and use
anologWrite(...) function to control the brightness of the LED.
Completion (Hard):
The Ultrasonic distance sensor has a narrow range - it can only detect objects straight ahead or within 7.5 degrees to each side.
Therefore, the radar that we built can only detect objects in this narrow range. If an object gets closer at a different angle, our radar cannot detect it.

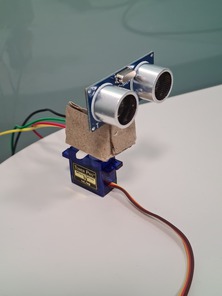
We can make the radar detect objects over a large range by rotating the sensor. We can rotate our radar using a servo motor.

Attach the ultrasound sensor to a servo motor. Improve
radar.ino sketch to periodically rotate the ultrasound sensor from 15 to 165 degrees and back.

Challenge (the hardest):
The current radar can only detect one object that is getting close. However, it does not show the angle of the detected object related to the radar.
- Add more LEDs to your design. The LEDs should show the angle of the detected object related to the radar.
Note: You must submit your files AND you must present your radar project to co-teachers or tutors in the lab.
This is a group lab.
You need to use a real Arduino to test your codes.
 Make sure your files have the right names.
Note: It is always important to make sure that your circuit is not powered while making changes to it. You can easily make incorrect connections, potentially damaging the components. So before you begin, make sure that the Arduino is unplugged from your computer or an external power supply.

 We can make the radar detect objects over a large range by rotating the sensor. We can rotate our radar using a servo motor.

