Digital Electronics, XMUT 2024
Lab2: Assembler, timers, polling and counting

Due 24 March (
Extended to 31 March) , 19 pm (Xiamen Time)
 Note: You must present your projects to co-teachers or tutors in the lab.
Resources and links:

Due 10 March , 19 pm (Xiamen Time)
To Submit:
-
Lab2Clock.asm
-
Lab2Clock.jpg (a picture of your breadboard for the Lab2Clock)
 Make sure your file has the name.
Part I: Introduction
During this session, the idea is to become familiar with the fundamentals of the Silicon Laboratories Integrated Development Environment (IDE) development system, which you will use to write, compile, and download programs to the C8051F02x chip development board.
We will also learn how to write “assembly” language programs. The task is to write some code to implement a digital clock.
Here we will be using one of the hardware timers and polling methods to control the timing of the program execution.
Installing Silicon Laboratories IDE
To run Silicon Laboratories IDE, follow the steps:
- Download KeilC51 and install it. Keil is the industry-standard toolchain for all 8051-compatible devices. It supports classic 8051.
- Download Silabs IDE and install it.
- Run the Silicon Laboratories IDE.
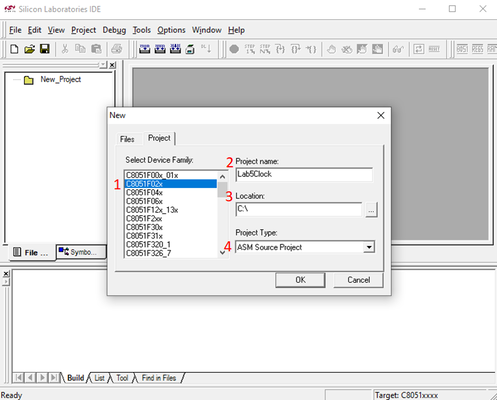
Now it is time to create your first project. From the menu, click Project -> New Project.
IDE will then ask you to select your target Device.
- Select Device Family -> C8051F02x
- Project name –> Lab2Clock
- Location – "Set the Project location to a folder where you want to store the project."
- Project Type –> ASM Source Project
- Click OK.
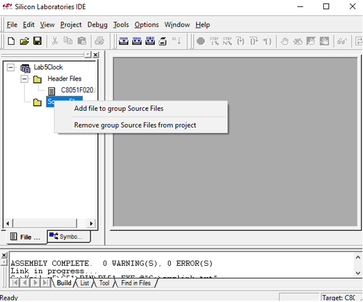
To add more files to your project, right-click on the corresponding folder in the Project Area, and click “Add files to group” or “Add group”.
Add “Lab2Clock.asm” to the group and double-click the file to open it for editing. The bulk of the window should be occupied by a text editor, where you will write and edit your code.
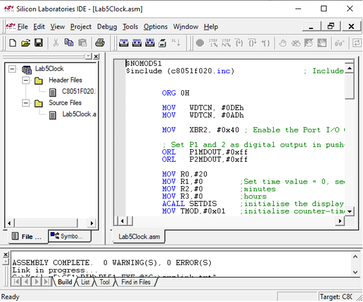
You can have multiple files open for editing in the main window, and each will have a tab on the top of the window. The bottom window will display Build Output, showing you memory statistics about your code once you compile it, and any compiler errors that come up in the process. The size of all of these windows can be adjusted by clicking and dragging their borders.
Now open file “
Hello.asm” and copy the text into “
Lab2Clock.asm”. Close “Hello.asm”. Save “Lab2Clock.asm”; this is the code of lab2 where we displayed the message “HELLO”. We will now compile (assemble) the code and run it to check that your hardware is working.
To build/compile your project, from the menu, click Project -> Build/Make Project or press F7. If the compile was successful, your Build Results should tell you there were no errors. If you did get errors, congratulations, you’ve made your first mistake. Ask your
demonstrator to help you fix it.
Note: when coding, you should check the compiler output very carefully. If the output of the compilation results in “Target not created,” this is a sign that something has gone wrong. It is useful to scroll up the build result window to see where things have gone wrong.
The next step is to see your program running, (it is rather useless otherwise!). To do this, we need to download the compiled program to the microprocessor board. The steps for preparing the micro board for programming are:
- Make sure your board has power, and the USB cable is plugged in.
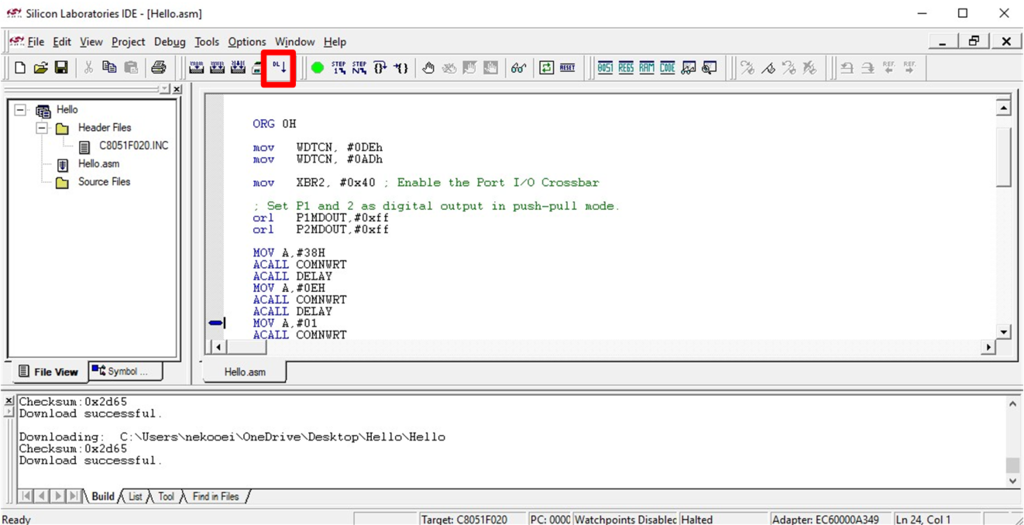
To download the program, from the menu click Debug-> Connect or Alt+C. Then hit the Load button, as shown in the figure below.
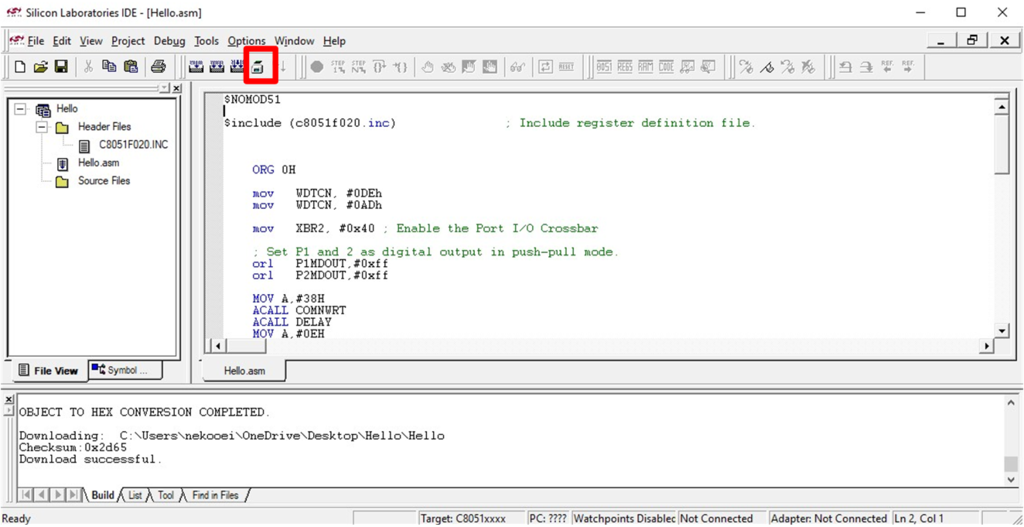
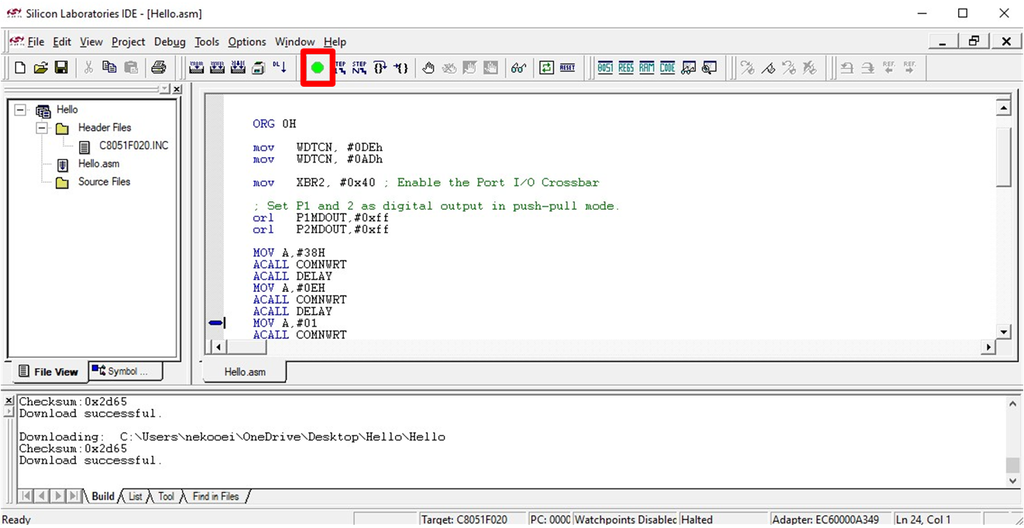
If everything went well, after a few seconds, your program should be finished downloading, hit the Go button or press F5 as shown in the figure below.
So we have now been into an editing environment, compiled a program, and "downloaded" it onto another microprocessor, from which our program was run.
Part II: Writing the code to count and display time.
You are now going to create your own program to perform the specific task of implementing a digital clock. Delete the code within “Lab2Clock.asm” and copy the code from “
Lab2Clock.asm”. This code is a template where the timer and some additional functions have been implemented for you. Your task is to write the code that updates and displays the count.
Additional tasks:
Try and change the code to make the clock start at a different time.
Note: You must present your projects to co-teachers or tutors in the lab.
 To add more files to your project, right-click on the corresponding folder in the Project Area, and click “Add files to group” or “Add group”.
Add “Lab2Clock.asm” to the group and double-click the file to open it for editing. The bulk of the window should be occupied by a text editor, where you will write and edit your code.

 You can have multiple files open for editing in the main window, and each will have a tab on the top of the window. The bottom window will display Build Output, showing you memory statistics about your code once you compile it, and any compiler errors that come up in the process. The size of all of these windows can be adjusted by clicking and dragging their borders.
Now open file “Hello.asm” and copy the text into “Lab2Clock.asm”. Close “Hello.asm”. Save “Lab2Clock.asm”; this is the code of lab2 where we displayed the message “HELLO”. We will now compile (assemble) the code and run it to check that your hardware is working.
To build/compile your project, from the menu, click Project -> Build/Make Project or press F7. If the compile was successful, your Build Results should tell you there were no errors. If you did get errors, congratulations, you’ve made your first mistake. Ask your
demonstrator to help you fix it.
Note: when coding, you should check the compiler output very carefully. If the output of the compilation results in “Target not created,” this is a sign that something has gone wrong. It is useful to scroll up the build result window to see where things have gone wrong.
The next step is to see your program running, (it is rather useless otherwise!). To do this, we need to download the compiled program to the microprocessor board. The steps for preparing the micro board for programming are:

 If everything went well, after a few seconds, your program should be finished downloading, hit the Go button or press F5 as shown in the figure below.
 So we have now been into an editing environment, compiled a program, and "downloaded" it onto another microprocessor, from which our program was run.
