XMUT101
Introductory Lab Exercise

Due 10 March , 19 pm (Xiamen Time)
Resources and links
To Submit:
- The
Question.txt file with a short answer to the question.
- The
Experience.txt file with a short answer to the question.
 Make sure your files have these names.
Summary of the introductory lab
There are seven parts in this introductory lab.
- Choose your group and your Kit box
- Registering your account:
 To submit your assignments, you need to log into the online submission and online questions systems with your ECS account.
- Navigating the XMUT101 web pages:
 Make sure you can access information on the XMUT101 web site, including the files you need for your assignments.
- Using the web-based submission system:
 Make sure you can submit your assignments for this course.
- Arduino, hello world!:
 Your first Arduino project.
1: Choose your group and your Kit box
All the labs must be in group work. So, you need to choose your group of 4 students.

You need to remember that all students must be in a group. Once you choose your group, you cannot change your group.
You need to give the following information to your co-teacher:
- Group Name
- Group members (4 students)
- First name
- Given name
- Student ID
2: Registering your account
To submit your assignments, you need to log into the online submission and online questions systems with your ECS account. Your account has already been set up. You only need to set a password.
If you have not done so already, you must go to
registering your account and fill in the "Guest/Other" part of the identification screen.
Your username will be xmut_ and your ID, (for example: xmut_1712409121) and the activation code is your student-ID (for example 1712409121). Then you can set a password for your login.
3: Using a browser and accessing the XMUT101 web site

Start a browser.
To access the XMUT101 website:
- Type in the URL
https://ecs.wgtn.ac.nz/XMUT
- From the table in Semester One, select XMUT101.
- Or, type in
https://ecs.wgtn.ac.nz/Courses/XMUT101_2024T1/

You will need to access this page a lot, so add it as a bookmark.

Look through the course home page to see what is there.
- Weekly timetable, showing the times of the lectures, labs, etc;
- Course schedule, which is where you can access copies of the slides from the lectures;
- Assignments page, with links for each assignment

Look at the Assignments page and find the online version of Introductory Lab (this lab). Find the link near the top of the lab exercise for downloading a zip file of all the files needed for the lab exercise.
For some of the labs or assignments, we will provide such a zip file.

Download the zip file now and unpack it to your home folder.
The browser may just save the zip file. If so, you will need to open it to unpack all the files. Alternatively, the browser may automatically unpack all the files. Either way, you should end up with a folder called
IntroLab in your home folder containing the files you need.
Note: You can do the same thing from your home computer to download the files to that computer.
4: Submitting your answers
For every assignment or lab, when you have finished your work, you should submit them using the online submission system.

In your web browser, go to the top of the Introductory Lab page and click on the
submit link. It should look something like this:
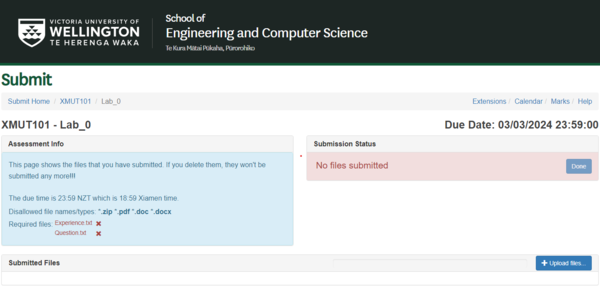
The submission page will let you upload your files to the submission system, where the markers can access them.
You may re-submit the same file as often as you like, but the submission system
will only remember the latest version of each file.
Open the
Questions.txt file using a file editor (for example TextMate), answer the question with a short line, and submit the saved version of the file.

Use the "+Upload files..." button, then navigate to and select the
Questions.txt file,
(which you downloaded in a previous section). Once you have uploaded the
Questions.txt file, it should look like this:
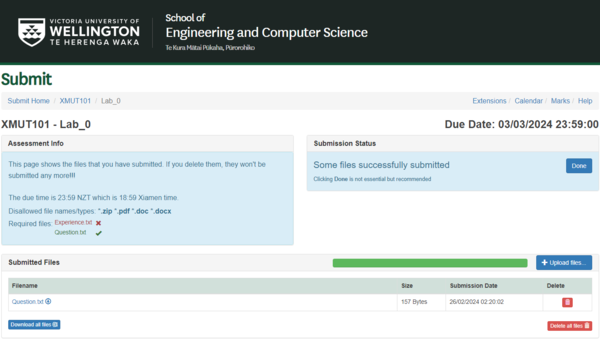
Note
- the green line indicates that the file was successfully added. If you click on the Submission logs button, you will also notice that your file is recorded as being uploaded.
- the green tick next to the name
Questions.txt in the Assessment Info panel shows that you have submitted one of the required files.
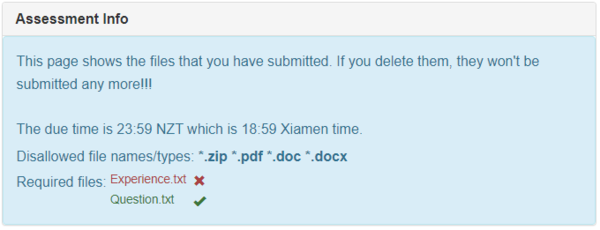
If you accidentally add a file the submission system does not accept, e.g.
Questions.pdf, the line will turn red as in the image below:
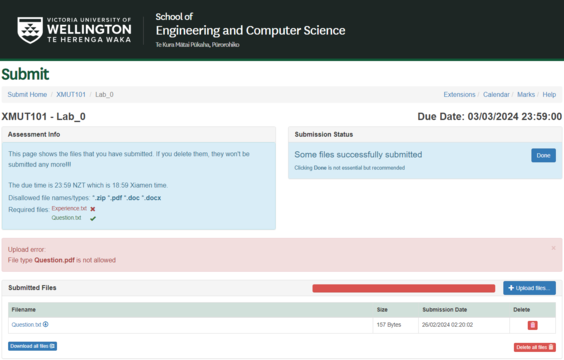

The error message helps you identify what the problem is.

Finally, when you have submitted all the required files, click the "Done" button. This will run automated checking of your submitted files that we have set for each assignment.
As you have not yet met all the requirements of this introductory lab (you still need to add the
Experience.txt file), you will see the following image. Note this contains instructions on how to fix the submission.
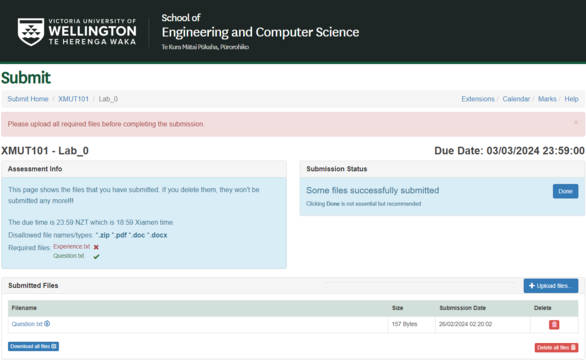 Even if the "Done" button results in an error message, the files you have submitted have still been accepted - you can see a list of all the files that you have successfully submitted in the "Submitted Files" section (and you check them by clicking on their names).
Open the
Experience.txt file using a file editor (for example TextMate), answer the question with a short line, and submit the saved version of the file. Click on
Done. Your checking process should succeed and you will be presented with the following screen. Note how the box surrounding the "Done" button has now turned green and shows the time of your completion.
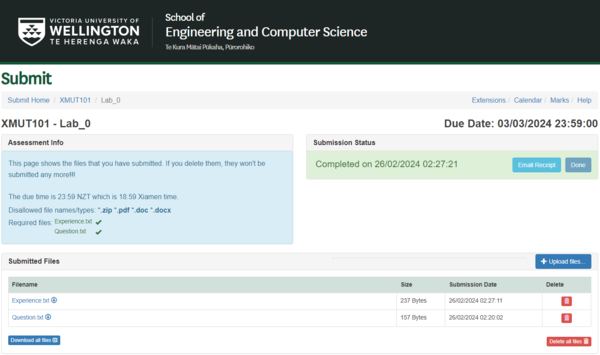 Note, if you don't click this button, you have still successfully submitted the files - they just haven't had the automated checking, and you cannot get a receipt
The "Submission Status" area can be shown in three different colours:
- red indicates that no files have been submitted. If you have submitted some files and then deleted all of them, the "Submission Status" area will turn back to red, indicating there are no files to be marked.
- blue indicates that some files have been submitted, but the Run Checks have not been run on this set of files, or you have not yet submitted all the required files, or the Run Checks found an error.
- green indicates that all the required files have been submitted and the Run Checks process has reported no error.
If you decide you want to change your work after submission, you
should submit it again using the same process. You can resubmit files
as many times as you wish --- your latest submission will be treated
as the real submission. This means that you can submit your program
earlier in the week when it is only partly done, and then submit it
again later when you have got more of it finished. This is a good way of
checking that the submission process is working.
5: Arduino hello world
First Step: Tinkercad simulator
The first Arduino program you construct will make the internal LED on the Arduino blink.
First, you will design it and test it on the Tinkercad simulator. Then, you will run your program on the real Arduino.

View the video to see how to use Tinkercad.
All Arduino programs have a similar structure. Since Blink is a simple program, it is easy to understand the program structure by examining it.
Second step: running on the real Arduino
Now install the Blink program on the Arduino and check that it works correctly.
Test yourself: Try changing the delay times to see what results you get. Here are a couple of things you can try:
- Make the LED blink the SOS signal (the international standard distress signal): 3 short blinks, 3 long blinks, 3 short blinks.
- See how fast you can make the LED blink before it appears to be on all the time.
Afterword
There are several important links at the bottom of the course home page:
- Support.WebHome has lots of useful documentation on many different aspects of the ECS computing system. Read through the list of topics just to get an idea of what is there - you may need some of it later.
- Change password, lets you change your password on the ECS computer systems (which are also needed for accessing the online questions and the submission systems from home).
- Read the advice about password security and phishing.
 To submit your assignments, you need to log into the online submission and online questions systems with your ECS account.
 Make sure you can access information on the XMUT101 web site, including the files you need for your assignments.
 Make sure you can submit your assignments for this course.
 Your first Arduino project.
 The submission page will let you upload your files to the submission system, where the markers can access them.
You may re-submit the same file as often as you like, but the submission system
will only remember the latest version of each file.
Open the
  Note
Note  If you accidentally add a file the submission system does not accept, e.g.
 Even if the "Done" button results in an error message, the files you have submitted have still been accepted - you can see a list of all the files that you have successfully submitted in the "Submitted Files" section (and you check them by clicking on their names).
Open the
  Note, if you don't click this button, you have still successfully submitted the files - they just haven't had the automated checking, and you cannot get a receipt
The "Submission Status" area can be shown in three different colours: