
Technical Note - Marking Scheduler
Summary
The Marking Scheduler application allows staff to set up marking schedules so that students can book in-person marking meetings with tutors. Staff create schedules for specific assignments, tutors indicate their available times, and students can then choose from the available slots to attend an in-person marking meeting. Important: Students can't book anything before tutor slots are confirmed or directly added by staff. The system is integrated with the ECS Assessment System, so all assignments already defined there are automatically available in the Marking Scheduler. Note that most pages have a Help button that will display additional help on the page.Staff Setup Process
Begin by selecting the relevant course from the Marking Scheduler. Next, click either:- the Setup Schedule and Tutors icon next to an assignment to configure marking schedules, or
- the Current Bookings icon to view existing bookings.
Adding a new schedule
To create a new marking schedule:- Click the Add Schedule button in the top right corner.
- Complete the schedule form, including: Start and end date/time, Room, Room size and Meeting duration.
- You can create more than one schedule for an assignment, as long as the time ranges don't overlap.
- Important: Schedule date and time ranges are fixed once created and cannot be edited. Only the room and room size may be updated after creation. Unbooked time slots may however be deleted if necessary.
Manage schedules
To manage an existing schedule, expand it from the schedule list. This will open the detailed scheduling view where tutors can be assigned to available time slots (note that staff can also be assigned to schedule slots using the same process). Three locking options are available to control changes to a schedule:- Lock student selections – prevents students from making or modifying bookings.
- Lock tutor selections – prevents tutors from setting or updating their availability.
- Lock all – applies both locks and additionally prevents further staff changes to the schedule.
View Bookings
This page displays a searchable table of all current bookings for an assignment, including both tutor and student allocations.- On the right-hand side of the page, a list of unbooked students is shown. If required, students can be dragged directly from this list into an available slot to create a booking manually.
- You can delete student bookings using the icon next to each booking.
- It is also possible to change the room for an individual booking by clicking on the room name within the booking entry.
- Bookings can also be exported using the Export button.
Tutor Process
Begin by selecting the relevant course on Marking Scheduler. Next, click either:- the Set Marking Availability icon next to the relevant assignment to setup your availability, or
- the Current Bookings icon to view existing bookings.
Setup Availability
If tutors are not directly assigned to time slots by staff, they are expected to indicate their availability within the schedule.- Click on an open cell to mark themselves as available for that time slot
- Click and drag across multiple cells to select several time slots at once
- Click or drag over selected cells to remove their availability
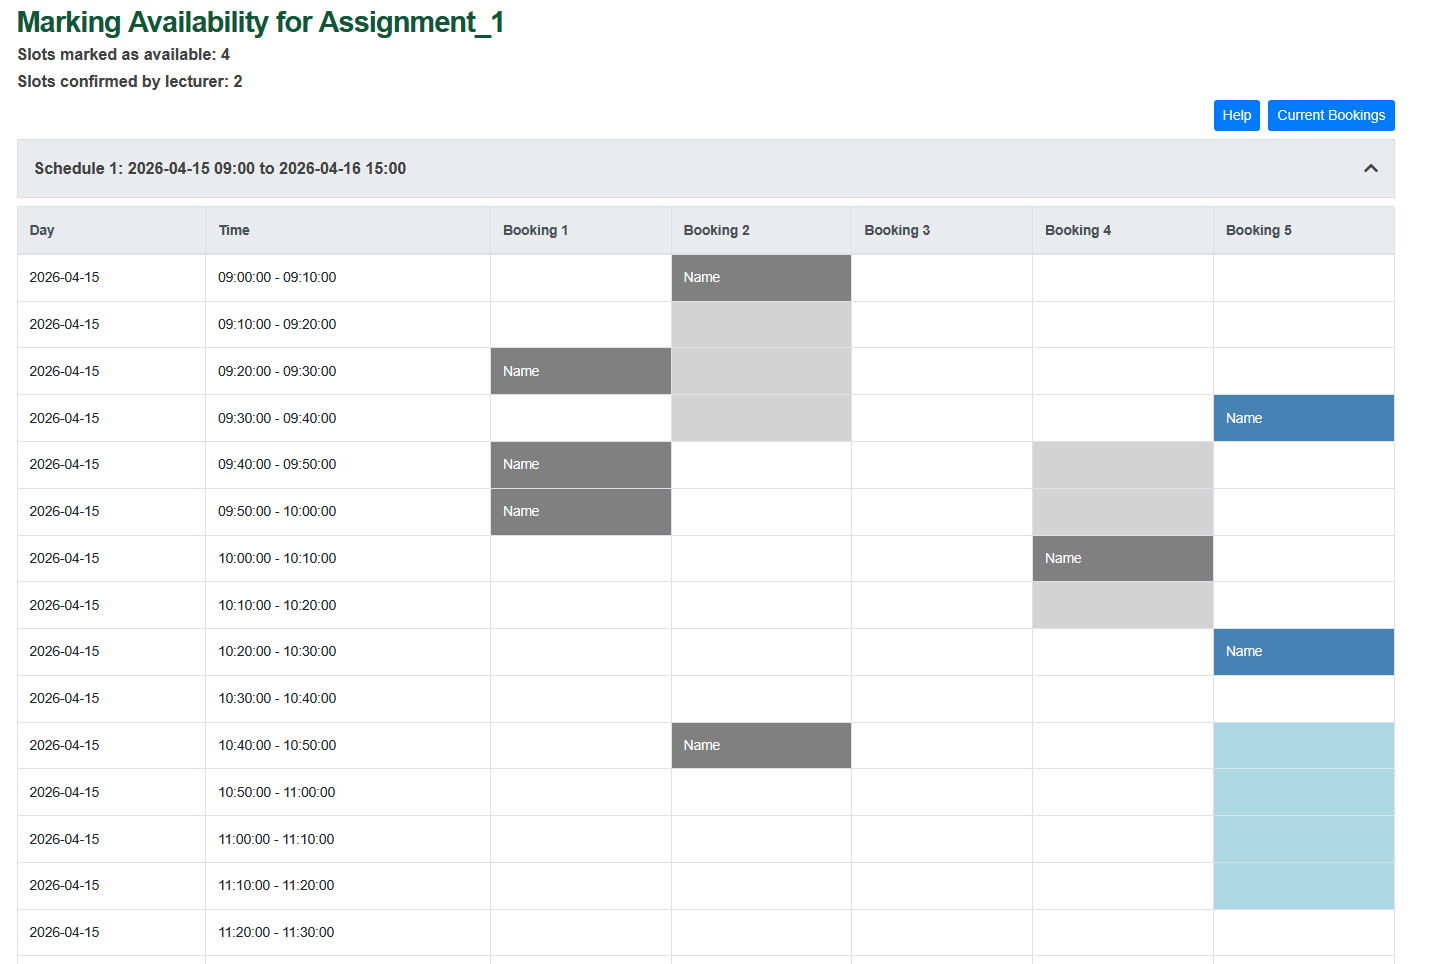
Tutor view

Tutor colour code
Viewing Bookings
Tutors can view their scheduled bookings via the Current Bookings link. This provides a calendar-style overview of all assigned bookings, with multiple viewing modes. Note: You can directly link to the student's submission by clicking on the booking in the calendar or list.Student Process
Once tutor slots have been confirmed or directly added by staff, students can book a marking slot.- To do this, go to the Marking Scheduler, select the relevant course, and click the Book a Marking Slot icon for the assignment.
- On the booking page, expand the relevant schedule and click on an available time slot to make a booking.
- Students can also change or cancel their bookings at any time, provided that student bookings have not been locked by staff.
- The on-page help panel has further instructions and also a code for the cell colours.
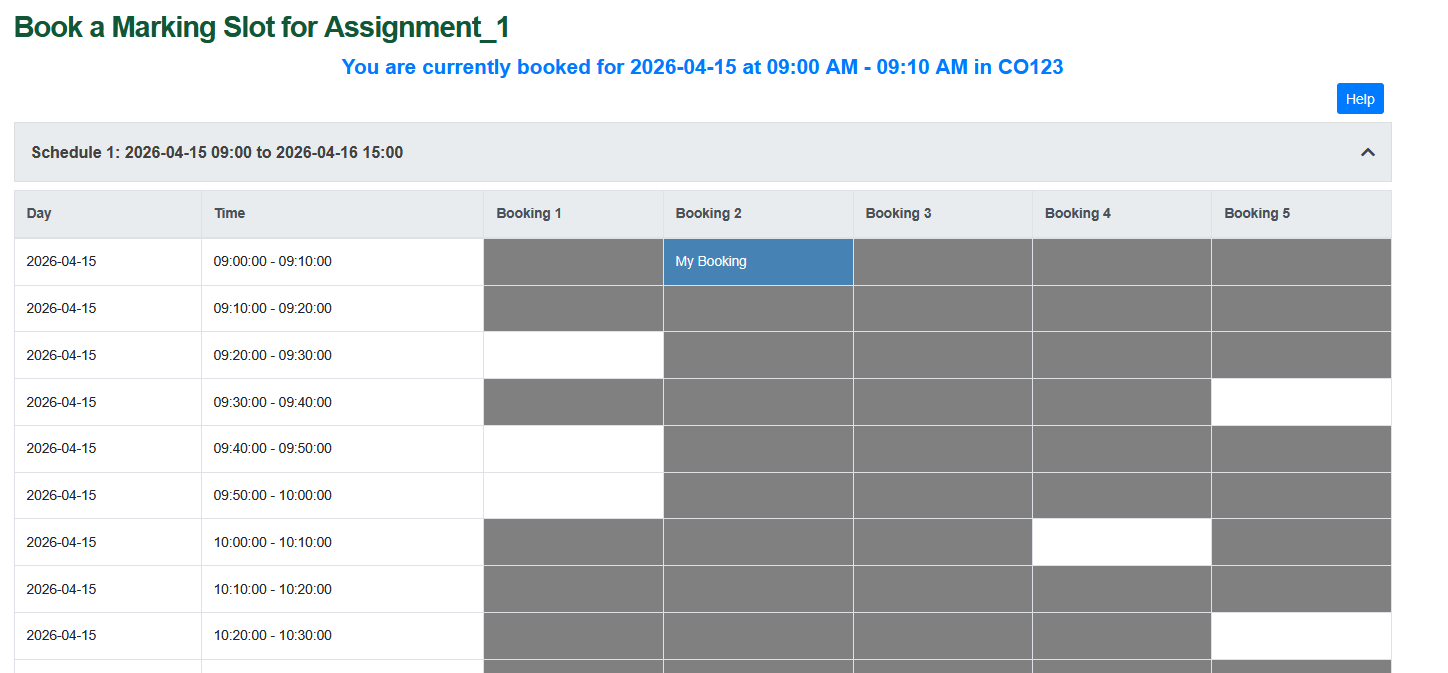
Student view
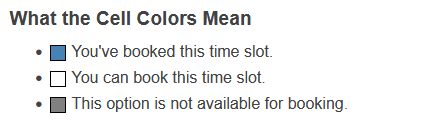
Student colour code