Technical Note - Personal Tomcat Server
Summary
This describes how to setup a Tomcat Server on our systems. NOTE: This is mainly intended for students doing team projects that have a shared team directory set up for them. It will work from a home directory but be aware of log files and such filling up your allowed disk quota.Details
NOTE: This refers to the example configuration here/vol/projects/example/tomcat/tomcat
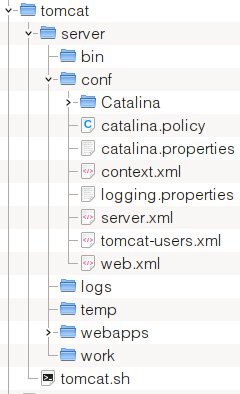
For this to make any sense you need to look at the script tomcat.sh and the server directory tree The easiest thing to do is copy the /vol/projects/example/tomcat/tomcat directory into your teams or home area and then modify any files as needed.
E.g rsync -av /vol/projects/example/tomcat/tomcat /vol/projects/mycourse/myteam Ok so let's assume you haved copied the example tomcat directory into /vol/projects/mycourse/myteam
It should look like below (Not all directories have been expanded to save space )
- Tomcat Directory:

Run ./tomcat.sh to find out what parameters the script uses but essentially it uses the normal start or stop parameters. After starting it try http://localhost:8181/sample/ in a web browser to test it out. Obviously if you are not on the same computer as what you started it on localhost should be changed to the correct computer name.
Modifying tomcat.sh
If you need to modify tomcat.sh read the comments as you may also have to change tomcat configuration files also. Important variables areCATALINA_BASE variable must point to the server directory. Eg. as in our example
/vol/projects/mycourse/myteam/tomcat/server
PORT Changing this also requires changing the tomcat server.xml config file.
