CYBR 171 2023 T1: Lab Exercise 1

Due 19 Mar 11:59pm
Goals
After completing this lab exercise you should:
- Be able to access ECS servers either from home or while at University.
- Be able to navigate your home file system using the command line and perform simple tasks.
- Be able to use the online submission system to submit your files.
This video provides an overview of the lab exercise.
Or use the following link:
https://vstream.au.panopto.com/Panopto/Pages/Embed.aspx?id=c8040af3-42c2-4fad-9175-ae510053abd2&autoplay=false&offerviewer=true&showtitle=true&showbrand=true&captions=false&interactivity=all
Resources and links
Unlike COMP 102 and ENGR101, this lab is done entirely online. You can attend a tutorial session though to get help from the tutors.
Preparation
Read through this lab exercise and watch the demonstration video for part three before you start to familiarise yourself with what needs to be done.
Summary of the lab exercise
This lab consists of a series of exercises to get familiar with the Linux environment. We will be using this environment for our next lab exercise and your first assignment.
Have a go at following along with the exercises (watch out for the

symbol against things to try).
It is fine to get the tutors or other students to help you with a task - that's how you will learn the key ideas in the course. You do not need to do all the exercises in parts 1-3 - you can stop a series once you have completed the suggested exercises (indicated by the

symbol) in these parts
without help.
You should complete or at least attempt the exercises in part 4. These are for you to test your understanding and for us to see how well you have understood. We will be marking this part based on whether you completed these or not.
There are four main parts and an afterword for this lab exercise.
- Registering and logging on:
 Make sure you registered to use the ECS computer systems. You can skip this part if you have done it in COMP 102.
- Working with the ECS servers:
 Make sure that you can access the ECS servers from wherever you are in the world and learn how to upload and download files.
- Using Linux on the ECS servers:
 Make sure you can use the Linux command line to create a working directory in your ECS file system, access, copy, move and delete files. You do not need to record your answers, these exercises are for learning the commands=.
- Exercises to complete to check your understanding:
 Complete these exercises, fill out the lab answers template and submit them via the submission system.
- Afterword:
 Some final ideas for finding out more and seeking support.
1. Registering and Logging on
In order to use the ECS lab computers locally or remotely, including the assignment submission system, you must have an active ECS username and password. This identifies you as an authorised user and allows you to access your files, and various files provided by the School. Note that the ECS computers are on a different system from the rest of the university, and therefore you need to set up your username and password on the ECS computers. Your username will be the same as on the other university computers, but your password should be different. Your username is case-sensitive and only contains lowercase letters and digits.
The first thing to do is to register/activate your ECS account (unless you have already done it for COMP102).
- If you are doing the lab remotely, go to register) and work through the registration process to register as a VUW Student, using your VUW usercode and password. This will allow you to use the assignment submission system and access pages on the ECS website that are restricted to enrolled students.
- If you are physically in the ECS labs, log in to your workstation using the username
register and the password register (all lower case).
- The computer will then lead you through the remainder of the registration process.
- Please read the lab rules carefully - it is important that you know what you can and can't do on the ECS lab computers.
- Note, the computers in the ECS labs should initially be displaying a login window. If the screen is dark, it may be in power-saving mode, and moving the mouse will re-activate it. If the computer shows a desktop screen because someone else is logged in already, ask your tutor for help.
- Once you have successfully activated your ECS account, you can log on, using your username and password. The login process takes some moments to run, so be patient.
2. Working with the ECS Servers
We ask you to use Linux on our servers in these two labs and assignments because it means that it provides a consistent environment for supporting you. Also, accessing our Linux servers via the command line is a low-tech reliable solution, given that you may not be able to come into University to use our lab machines.
Another reason is that learning some basic Linux commands is a useful skill of both software and cybersecurity engineers due to the widespread use of this operating system. Linx is variously estimated as having a worldwide market share of around
2% of desktops but estimates between 70 and 90% of cloud infrastructure and hosting services. Linux and "Linux-like" Mac OS is used by 55% of professional developers (
Stackoverflow 2021.
This video provides an overview of this section of the lab exercise:
2.1 Which server to connect to
When you use our lab desktops your files are kept on a central file system. This file system is accessible from any lab desktop machine and also any of our
undergraduate server machines. This means you can start working on one lab desktop and access the same files even if you switch to a server or other lab desktop later.
In this lab exercise, we use
barretts.ecs.vuw.ac.nz, but you can use any undergraduate server except for
lighthouse.ecs.vuw.ac.nz. Don't use
lighthouse.ecs.vuw.ac.nz because it uses a different variety of Linux than the other servers, and your answers will not look like ours!
2.2 What is SSH
SSH stands for "Secure Shell". It is a network protocol to allow secure access to remote machines. The previous protocol telnet provided remote access but was insecure because attackers eavesdropping on communication could observe what was being typed by the user and returned by the server. SSH has a set of utilities implementing services such as remote access and secure file copying. This
video provides a high-level view of how SSH works.
The ECS network is configured to allow incoming ssh connections to all students. You should be able to access a machine from anywhere in the world.
- Windows: will want to use PuTTY to get an SSH connection.
- OS X, Linux: You should have
ssh installed and accessible from the command-line.

Kia tūpato! Make sure that you use your ECS username and password
not your University username and password.
2.3: Windows SSH

Follow these steps to install and use PuTTY (based upon
wikiHow).
1.
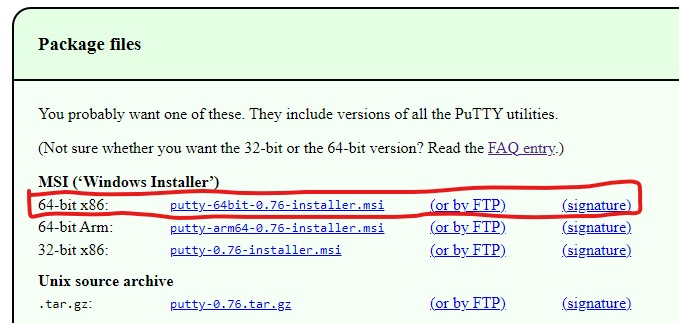
Download the "msi" installer file from the "package files" section. It will also install some additional tools that you might want to use later such as PSFTP. You most likely want to download the 64-bit x86 version.
2.
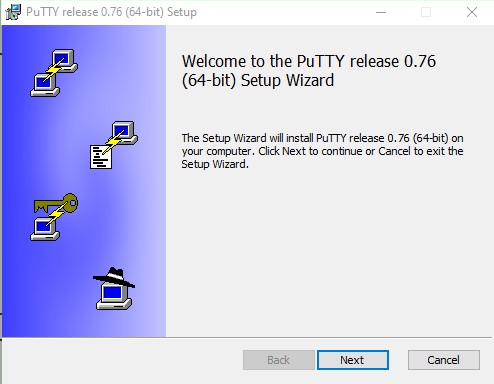
Run the PuTTY installer. Double-click the installer you downloaded (it will be in your default Downloads folder), then follow the on-screen instructions to install PuTTY. Just choose the default settings, and you will be okay. PuTTY (and PSFTP) will be added to your Start menu once the installation is complete.
3.
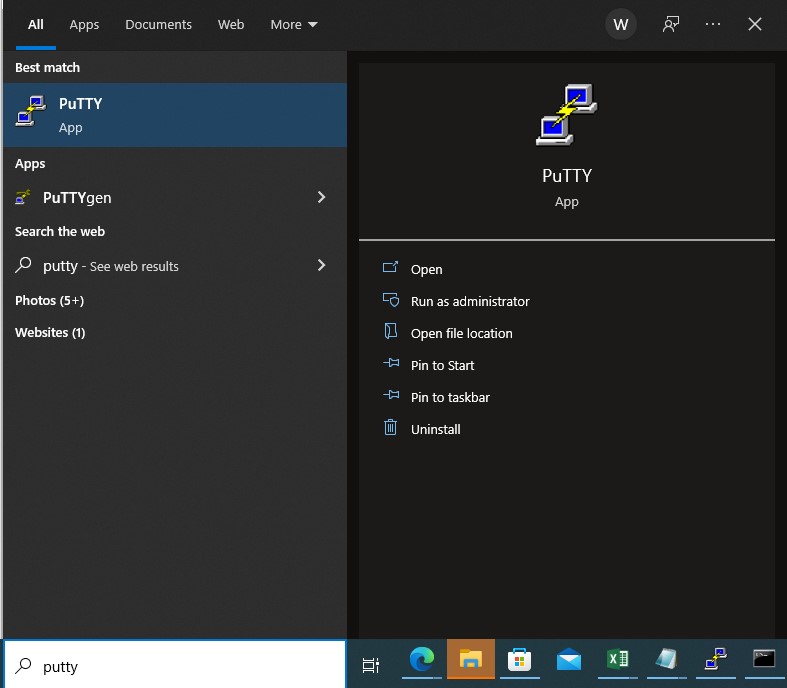
Open PuTTY on your computer. It will be in the Start menu. PuTTY will open to a configuration screen.
4.
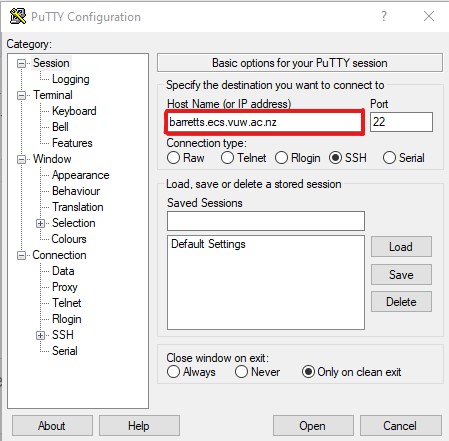
Fill out the connection fields on your PuTTY client. After you start up PuTTY, a dialogue box will pop up on your screen.
- Type the name of the ECS server machine you want to connect to into the "Host Name" field. A hostname looks like a string of words, like
barretts.ecs.vuw.ac.nz.
- SSH is selected by default, which sets the "Port" field to 22. If you need to SSH to a different port, enter that port now.
- Click Save to create a profile. This makes it so you can quickly select this host in the future.
5.
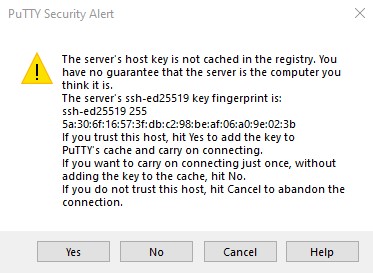
Click on open to connect to the server. The first time that you connect, you might be asked, "The server's host key is not cached in the registry.", you should choose
Yes to indicate that you trust the server (more about this in lectures). Once the connection is successful, you will be prompted to enter your
ECS username and
ECS password to log in.
2.4 OS X, Linux SSH
Mac OS and Linux feature a built-in SSH client called that allows you to quickly and easily connect to a server.

Open a Terminal window (usually
terminal).

Once the Terminal is open, enter the command in the format
ssh [USERNAME]@[HOSTNAME]. Replace
USERNAME with your ECS username and the
HOSTNAME with one of our servers.
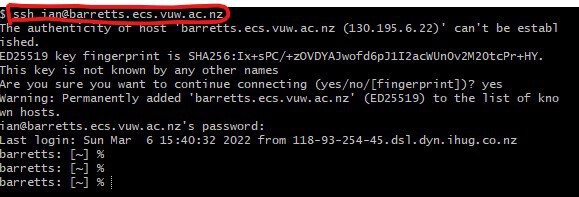
The first time that you connect, you might be asked, "Are you sure you want to continue connecting?", you should say yes in this case (more about this in lectures).
Here is an example for the username
ian and
barretts.ecs.vuw.ac.nz.
2.5 Capturing Output to Submit
You will need to capture the output of using your commands as part of this lab and future labs and assignments. There are two ways. The first is to take a screenshot and paste it into a Word document. The second is the COPY and PASTE the output into a text file.
The second is required for this lab exercise.
3. Using Linux on the ECS servers
Now it is time to get introduced to navigating through the filesystem using Linux commands and working with files.
Note that we assume you have followed the steps above and am now logged into the server.
The video below covers the highlights of this section of the lab exercise.
3.1 Introductory Terms and Concepts
Before we begin, here are some terms and concepts that will be used later (note that some of this discussion comes from the book
Linux Basics for Hackers available from the library).
- Case sensitivity. The Linux filesystem is case-sensitive. This means that
Downloads is different from downloads, which is different from DownLoads. Each of these would represent a different file or directory name. Many people coming from a Windows environment can find this frustrating. If you get the error message "File or directory not found", and you are sure the file or directory exists, you probably need to check your case.
- Directory. This is the same as a folder in Windows or Mac OS. A directory provides a way of organizing files, usually in a hierarchical manner.
- Filesystem. This is where files live on a computer. Windows and Mac OS have file systems with user directories and system directories. You are probably used to navigating folders using the graphical user interface, but we are going to use the command line. A key difference from Windows is that Linux does not have physical drives at the base of the filesystem but uses a logical filesystem with
/ at the top. Even if you have multiple physical drives, they all share / at the top. The / is called the root of the filesystem.
- Home. Each user has their own
/home directory, and this is generally where files you create will be saved by default. On the ECS systems, this is a network share meaning that it is accessible from any ECS machine.
- root. Like nearly every operating system, Linux has an administrator or superuser account, designed for use by a trusted person who can do nearly anything on the system. This would include such things as re-configuring the system, adding users and changing passwords. In Linux, that account is called root. Hackers or pentesters will often use the root account to give themselves control over the system. Note this is different from the root of the filesystem.
- Shell. This is an environment and interpreter for running commands in Linux. The most widely used shell is bash, which stands for Bourne-again shell, but other popular shells include the C shell and Z shell. Within ECS we use Z shell (
zsh).
- Terminal. This is a command line interface (CLI).
In the examples below, I will show you what it looks like before the command is entered and afterwards. Note that if you are not using
barretts that it will look different, and the directory names will refer to my user rather than yours.

Watch the demonstration video to see what you need to do in this part of the exercise.
3.2 Structure of Commands
All commands are entered at the command line, the general form of a UNIX command is
command [-option(s)] [argument(s)].
The
command will generally be lowercase, and spaces are used to separate it from
options and
arguments.
All options start with a
- and are used to tell the command to behave differently from the default. There can be a list of options.
The argument(s) is what the command acts upon. There can be multiple arguments, all separated by spaces.
Remember that commands, options and arguments are case-sensitive.
3.3 Editing Commands
You can use simple editing with the
zsh shell using these keys:
- Pressing
UP arrow to retrieve the previous command.
- Pressing
DOWN arrow to retrieve the next command.
- Pressing
LEFT and RIGHT arrow to move within a line.
- Pressing
BACKSPACE to delete characters.
- Pressing
TAB will autocomplete a partial file name in the current working directory.
Note that the
BACKSPACE and
DEL keys might act differently depending on the SSH client being used.
3.4 Finding Yourself with pwd
Unlike when you are working in a Graphical User Interface (GUI) environment like Windows or macOS, the command line in Linux does not always make it apparent which directory you are presently in. To navigate to a new directory, you usually need to know where you are currently. The present working directory (or print working directory) command,
pwd, returns your location within the directory structure.

Enter
pwd in your terminal to see where you are:
barretts% pwd
/home/ian
3.5 Changing Your Prompt
It can be very easy to get lost in the filesystem, so the first thing we are going to do is change your prompt during this session.
A command prompt, also referred to simply as a
prompt, is a short text message at the start of the command line on a command-line interface.
You can modify this by changing the shell variable
PROMPT. A shell variable is a special variable that is set by the shell and is required by the shell in order to function correctly.
The default prompt in
zsh is
%m%#. The
%m shows the server name, the
%# shows a # when the current user is root and otherwise, the % symbol.
You can include other information, such as your current directory, by including special characters as documented in the
zsh documentation. When you have completed this lab exercise you might want to experiment with these

Enter
PROMPT='%m %/ %# ' in your terminal to change the prompt to include the current directory
%/ to see where you are:
barretts% PROMPT='%m %/ %# '
barretts /home/ian %
In this case, Linux says that I am in the directory
/home/ian, which is one level below the
home directory.
Note: When you exit the current
prompt will be lost. You would need to edit the file
.zshrc file, so it will take effect in all your zsh sessions. This is left as an exercise for interest.
3.6 Navigating the Linux Filesystem
We will be using the filesystem from the terminal. In a GUI-based system like Windows, you can visually see the directories, but when you are using the command-line interface, the structure is entirely text-based, and navigating the filesystem means using some commands.
Changing Directories with cd
To change directories from the terminal, use the change directory command,
cd.

Try the command
cd /etc to change to the
/etc directory used to store configuration files:
barretts /home/ian % cd /etc
barretts /etc %
The prompt changes to
barretts /etc %, indicating that we are in the
/etc directory.

Check this by entering
pwd:
barretts /etc % pwd
/etc
You can move up to the root level in the file structure from anywhere by entering
cd /, where
/ represents the root of the filesystem.
You can also quickly return to your filesystem from anywhere by entering
cd.

Try this by entering
cd:
barretts / % cd
barretts /home/ian %
In the example above, I am now back in my home directory
/home/ian.
To move up one level in the file structure (toward the root of the file structure, or
/), we use
cd followed by double dots (
..).

Try entering
cd .. to move one level up from your current directory:
barretts /etc % cd ..
barretts / % pwd
/
barretts / %
This moves us up one level from
/etc to the
/ root directory, but you can move up as many levels as you need. Just use the same number of double-dot pairs as the number of levels you want to move:
- You would use .. to move up one level.
- You would use ../.. to move up two levels.
- You would use ../../.. to move up three levels, and so on.
So, for example, to move up two levels, enter
cd followed by two sets of double dots with a forward slash in between.

Try entering
cd first to make sure you are in your home directory, followed by
cd ../.. to move two levels up from your current directory to the root:
barretts /home/ian % cd ../..
barretts / %
Listing the Contents of a Directory with ls
To see the contents of a directory (the files and subdirectories), we can use the ls (list) command. This is very similar to the dir command in Windows. It will show what is in the current working directory.

Check this by entering
cd /boot to change to the boot files directory and
ls to list files found there:
barretts / % cd /boot
barretts /boot % ls
grub  initramfs-linux-fallback.img  initramfs-linux.img  lost+found  vmlinuz-linux
barretts /boot %
This command lists both the files and directories contained in the directory. You can also use this command on any particular directory, not just the one you are currently in, by listing the directory name after the command; for example,
ls /etc shows what is in the
/etc directory.
To get more information about the files and directories, such as their permissions, owner, size, and when they were last modified, you can add the
-l option after
ls (the
l stands for long). This is often referred to as a long listing.
Let’s try it here:

Try this by entering
ls -l /etc to list files found there:
barretts /boot % ls -l /etc
total 3504
-rw-r--r--  1 root   root    15078 Dec 12  2019 a2ps.cfg
-rw-r--r--  1 root   root     2557 Nov 22  2014 a2ps-site.cfg
-rw-r--r--  1 root   root      692 Sep  8  2012 abs.conf
-rw-r--r--  1 root   root       49 Nov 17  2012 adjtime
--snip--
-rw-r--r--  1 root   root       33 Sep  9  2013 zshenv
As you can see,
ls -l provides us with significantly more information, such as whether an object is a file or directory, the number of links, the owner, the group, its size, when it was created or modified, and its name.
Some files in Linux are hidden and won’t be revealed by a simple
ls or
ls -l command. To show hidden files, add a lowercase
–a option, for example,
ls -la. You can create hidden files by starting their name with
..
3.6 Modifying Files and Directories
Once you have found your files and directories, you will want to be able to perform actions on them. In this section, we look at how to
create files and directories,
copy files,
rename files, and
delete files and directories.

Before we start, make sure that you are in your home directory by entering
cd:
barretts /boot % cd
barretts /home/ian %
In the example above, I have changed my current directory from
/boot to my home directory.
Creating a directory
The
mkdir command followed by a filename will create a directory with that name if none already exists.

Try this by entering
mkdir CYBR171-2023T1 followed by
cd CYBR171-2023T1 to change working directory:
barretts /home/ian % mkdir CYBR171-2023T1
barretts /home/ian % cd CYBR171-2023T1
barretts /home/ian/CYBR171-2023T1 %
In this example, I now have the directory
CYBR171-2023T1 in my home directory. Should you enter the name of the directory wrong, you might get this message:
barretts /home/ian % cd CYBR171-2023T2
cd: no such file or directory: CYBR171-2023T2

Create a subdirectory to hold this lab work by entering
mkdir lab01 followed by
cd lab01:
barretts /home/ian/CYBR171-2023T1 % mkdir lab01
barretts /home/ian/CYBR171-2023T1 % cd lab01
barretts /home/ian/CYBR171-2023T1/lab01 %
In the example above, I have created a directory within
CYBR171-2023T2 called
lab01. Be careful, if you were in a different working directory when you used
mkdir lab01 then the subdirectory will be elsewhere.
Creating a file
The
cat command followed by a filename will
display the contents of that file, but to create a file, we follow the
cat command with a redirect, denoted with the
> symbol, and a name for the file we want to create. Here is an example:

Enter
cat > hackingskills followed by
Hacking is great!, the
ENTER key and press
CTRL-D to exit:
barretts /home/ian/CYBR171-2023T1/lab01 % cat > hackingskills
Hacking is great!
When you press
ENTER, Linux will go into interactive mode and wait for you to start entering content for the file. This can be puzzling because the prompt disappears, but if you simply begin typing, whatever you enter will go into the file (in this case,
hackingskills). Here, I entered
Hacking is great!. To exit and return to the prompt, I press
CTRL-D.

Enter
cat hackingskills to see what is in the file:
barretts /home/ian/CYBR171-2023T1/lab01 % cat hackingskills
Hacking is great!
Copying a file
To copy files, we use the
cp command. This creates a duplicate of the file in the new location and leaves the old one in place. We have to specify the name of the file to copy and the name to use for the copy.

Enter
cp hackingskills hackingskills2 to copy the
hackingskills file to a new file named
hackingskills2:
barretts /home/ian/CYBR171-2023T1/lab01 % cp hackingskills hackingskills2
barretts /home/ian/CYBR171-2023T1/lab01 % ls
hackingskills  hackingskills2
Renaming a file
To rename a file, we have to move it using the
mv command. The
mv command can be used to move a file or directory to a new location or simply to give an existing file a new name. Similar to
cp, you specify the name of the file to move and its new name.To rename
newfile to
newfile2, you would enter the following:

Enter
mv hackingskills hackingskills1 to copy the
hackingskills file to a new file named
hackingskills1:
barretts /home/ian/CYBR171-2023T1/lab01 % mv hackingskills hackingskills1
barretts /home/ian/CYBR171-2023T1/lab01 % ls
hackingskill1  hackingskills2
Editing a file
You may also want to edit a file. On our systems, you can use the
nano editor. The following will cause our file
file.txt to be opened.

Enter
nano hackingskills to edit the file, make some changes and press
CTRL-X to save. You will be prompted
Save modified buffer?. Press
Y to save and
N to throw away edits. Press
ENTER when it prompts you for a file name. Try entering
cat hackingskills to confirm that any changes were applied:
barretts /home/ian/CYBR171-2023T1/lab01 % nano hackingskills
Hacking is great!
Really!
In the example above, I added the line
Really!.
Removing a file
To remove a file, you can simply use the
rm command.

Enter
rm hackingskills to remove the file, followed by
ls to confirm that it has been deleted:
barretts /home/ian/CYBR171-2023T1/lab01 % rm hackingskills
barretts /home/ian/CYBR171-2023T1/lab01 % ls
barretts /home/ian/CYBR171-2023T1/lab01 %
In the example above, I removed my
hackingskills file and confirmed it using
ls.
Removing a directory
The command for removing a directory is similar to the
rm command for removing files but with
dir (for directory) appended.

Enter
mkdir test to create a directory, followed by
rmdir test to remove it:
barretts /home/ian/CYBR171-2023T1/lab01 % mkdir test
barretts /home/ian/CYBR171-2023T1/lab01 % ls
hackingskills  test
barretts /home/ian/CYBR171-2023T1/lab01 % rmdir test
barretts /home/ian/CYBR171-2023T1/lab01 % ls
hackingskills
barretts /home/ian/CYBR171-2023T1/lab01 %
In the example above, I created
test and removed it. I used the
ls command to confirm that it was happening as expected.

Enter
rmdir missing to try and remove a directory that did not exist in the first place:
barretts /home/ian/CYBR171-2023T1/lab01 % rmdir missing
rmdir: failed to remove 'missing': No such file or directory
It’s important to note that
rmdir will not remove a directory that is not empty, but will give you a warning message that the
directory is not empty as you can see in this example. You must first remove all the contents of the directory before removing it. This is to stop you from accidentally deleting objects you did not intend to delete. Note that there is a way to force it, but it can go wrong and should be used with care.
3.7 Working with Larger Files
We will use larger files for our examples than a couple of lines. In this section, we look at how to download a file and use the command line tool to read its content.
Downloading a file
This is easy to do using a GUI on the ECS desktop machines but working with the terminal requires you to use the
curl command. The command takes the option
-O (capital letter 'o', not the digit 0) that causes the file to be saved with the same name and the
URL pointing to the file to be downloaded.

Enter
curl -O https://www.gutenberg.org/files/11/11-0.txt to download a copy of
Alice in Wonderland:
barretts /home/ian/CYBR171-2023T1/lab01 % curl -O https://www.gutenberg.org/files/11/11-0.txt
  % Total    % Received % Xferd  Average Speed   Time    Time     Time  Current
                                 Dload  Upload   Total   Spent    Left  Speed
100  170k  100  170k    0     0  61710      0  0:00:02  0:00:02 --:--:-- 61703
barretts /home/ian/CYBR171-2023T1/lab01 % ls
11-0.txt
In this example, the file is downloaded to the file
11-0.txt.
Viewing large files
There are three commands that are useful here:
less,
head and
tail. The
less command allows you to scroll backwards and forwards through a file using the arrow keys, when done, press the
Q key. The
head command displays the first part of the file with the number of lines to display defaulting to 10 unless you specify the number using the option
--lines. The
tail command displays the last part of the file with the number of lines to display, also defaulting to 10 unless you specify the number using
--lines.
Here are things to try:

Enter
less 11-0.txt to scroll through the downloaded file.

Enter
head --lines=2 11-0.txt to display the first two lines of the downloaded file.

Enter
tail --lines=5 11-0.txt to scroll through the first two lines of the downloaded file.
4. Exercises to Complete
This section introduces some exercises to test your understanding, notes on submission and extensions. Note that we want you to complete, if you can't answer these questions, do make sure you attend a tutorial session to get some help to complete the lab exercise.
The Exercises
Complete the following exercises. Copy the commands used to solve the exercise and their output into the file
Lab1_answer_sheet.txt. The best way to do this is to open
Lab1_answer_sheet.txt on your desktop and copy and paste from the console window.
It is important to use commands like pwd and ls to provide evidence of the current path and the content of the current directory.

Change your command prompt to show the server machine you are logged into and your current working directory.

Use the
ls command from the root (
/) directory to explore the directory structure of Linux. Pick THREE directories under root to explore. Move to each of the directories with the
cd command and run
pwd to verify where you are in the directory structure.

Use the
whoami command to verify which user you are logged in as.

Change your working directory to the
lab01 directory you created earlier. Create a new directory called
hackerdirectory within it and create a new file in that directory named
hackedfile. Now copy that file to your home directory and rename it
secretfile.

Change your working directory to the
lab01 directory you created earlier. Download the file located at
https://www.gutenberg.org/files/36/36-0.txt. Display the first sixteen and last five lines.

Create a hidden file in the
lab01 directory containing the phrase "You can't find me". Use the
ls and
cat commands to show that it exists.
Submitting your answers

Submit your answers to these questions using the submission system. In your web browser, go to the top of the Lab Exercise 1 page, and click on the
"Submit" link.
The submission page will let you upload your files to the submission system, where the tutors and markers can access them.
You may re-submit the same file as often as you like, but the submission system will only remember the latest version of each file.

Use the "+Upload files..." button, then navigate to and select the
Lab1_answer_sheet.txt file, which you created on your desktop computer.
If you accidentally add a file the submission system does not accept, e.g.
Lab1_answer_sheet.docx there will be a red line shown.
Once you submit your answers, your complete submission process should succeed, and you will be presented with a success screen.
If you decide you want to change your answers after submission, you should submit it again using the same process. You can resubmit files
as many times as you wish --- your latest submission will be treated as the real submission. This means that you can submit your answers
earlier in the week when it is only partly done, and then submit it again later when you have got more of it finished. This is a good way of checking that the submission process is working.
Extension Requests
The submission system allows you to request extensions. Note that we do not apply late days to lab exercises, only to the assignments that represent a larger piece of work. We also want to release videos showing our solutions so we may not accept late exercises.
For exceptional circumstances, you may need to make arrangements with the course coordinator and request an extension. You can do this by first click on the "Extensions" link at the top right of a submission page.
This will direct you to
Extension Requests for CYBR171 page.
This page displays the Extensions that have been granted in the "Current Extensions" section at the top, and the ones you have requested in the "Previous Requests" section below.
To make a request, click on the "Request Extension" button. It will allow you to select the lab exercise or assignment, enter a Justification/Explanation, and attach supporting documents.
Please do not try this now and only use when necessary. Once your request has been sent, the course coordinator will receive an email. You will be notified by email when the extension is granted.
5. Afterword
There are several important links at the bottom of the course home page:
- Support.WebHome has lots of useful documentation on many different aspects of the ECS computing system. Read through the list of topics just to get an idea of what is there - you may need some of it later.
- Change password, lets you change your password on the ECS computer systems (which are also needed for accessing the submission system from home).
- Read the advice about password security and phishing.
Here are some things you can try (more advanced users):
 Make sure you registered to use the ECS computer systems. You can skip this part if you have done it in COMP 102.
 Make sure that you can access the ECS servers from wherever you are in the world and learn how to upload and download files.
 Make sure you can use the Linux command line to create a working directory in your ECS file system, access, copy, move and delete files. You do not need to record your answers, these exercises are for learning the commands=.
 Complete these exercises, fill out the lab answers template and submit them via the submission system.
 Some final ideas for finding out more and seeking support.
 2. Run the PuTTY installer. Double-click the installer you downloaded (it will be in your default Downloads folder), then follow the on-screen instructions to install PuTTY. Just choose the default settings, and you will be okay. PuTTY (and PSFTP) will be added to your Start menu once the installation is complete.
 3. Open PuTTY on your computer. It will be in the Start menu. PuTTY will open to a configuration screen.
 4. Fill out the connection fields on your PuTTY client. After you start up PuTTY, a dialogue box will pop up on your screen.
  5. Click on

