Getting started with Subversion and Eclipse
Subversion is a freely available, open source
version control system which replaces the older, and somewhat antiquated
Concurrent Versions System (CVS). Subversion can be operated from within Eclipse using the
Subclipse plugin; or, Subversion can be operated directly using a command-line interface (see the
online book for more on this). One useful feature of Subversion is that you can access the repository remotely. This means you can work on the project at home, in the labs or anywhere you have access to the internet. Since the files are stored in a central repository, you will always be able to get the latest version of your project.
STEP 1 - Creating a Repository
The first step to using Subversion is to create a Subversion repository. Unfortunately, this cannot be done from within Eclipse at this time. To do this, you need to run a command similar to the command from a terminal:
> svnadmin create /path/to/your/repository
This will create a directory called
repository inside the directory
/path/to/your/. Here, you should replace
/path/to/your/ with the location where you want your repository to be stored. Be careful not to change the contents of your repository by hand (i.e. without going through Subversion), as this will corrupt your repository!
At this stage, the repository will be owned by whoever created it. If working in a group, the owner needs to give permissions for his/her group to read and write the repository. This can be done by running the following commands from a terminal:
> chgrp -R group-id /path/to/your/repository
> chmod -R g=u /path/to/your/repository
You can check the group has the appropriate permissions with the command:
> ls -l /path/to/your/
> total 1
> drwxrwx---  7 djp  group-id  512 May  9 14:02 repository
The key things to look for here are: firstly, that there are two sets of "
rwx "; secondly, that after the login of the person who created the repository (in this case
djp), you see your group id.
STEP 2 - Locating your Repository within Eclipse
Before you can use your repository from within Eclipse, you must first locate it! Start up Eclipse and
select "New" from the "File" menu, then choose "Other". This will bring up the following window:

You need to scroll down, expand the "SVN" item (as shown above) and select "Checkout Projects from SVN". In the next window, select "Create a new repository location" which will take you to the following:

You'll need to enter the location of your repository (as has been done above) using the correct team ID. After a short time, a window will pop up asking you which folder you want to checkout from your repository. The list of available folders will be empty (since you haven't put anything in your repository yet). A bug in Subclipse means that clicking on "Finish" at this stage doesn't do anything. Instead, click on
"Cancel" --- but don't worry, Eclipse will remember where you repository is now!
STEP 3 - Importing the Initial Version of your Project
At this stage, create an Eclipse project in the usual manner (i.e. as a Java application), giving it a
sensible name such as "Group Project". If you have any source files already written, you can include them
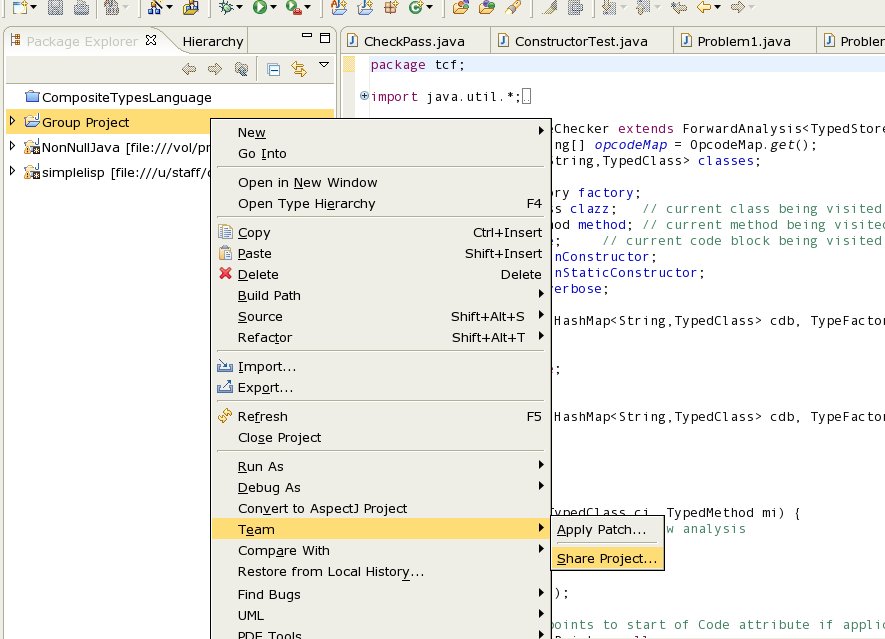
in this project (or use an existing project if you have one). Then, right-click on the project name, select "Team" and then "Share Project":
At this stage you will be asked to "select the repository plug-in to use". Choose "SVN" (for Subversion) and press "Next". You will then be asked which repository location to use:

If you have completed Step 2 correctly, you should be able to see your repository. Select it and click
"Next". Eclipse then asks what name to use for the folder in the repository. Stick with the default "use project name as folder" and click "Finish". After some time, you will be asked to enter an initial "Commit Comment":

Finally, click "OK" and you're done! When you return to the main Eclipse window, you should see a little star next to your project folder. This means the project is now under Version Control.
The
next tutorial will cover the basics of using Subversion with Eclipse.
Introduction | Creating a Repository | Subversion Basics | Dealing with Conflict.