Tutorial - Eclipse: Hello World
Hello World Tutorial
This tutorial will walk you through the process of writing your first Java application under Eclipse.
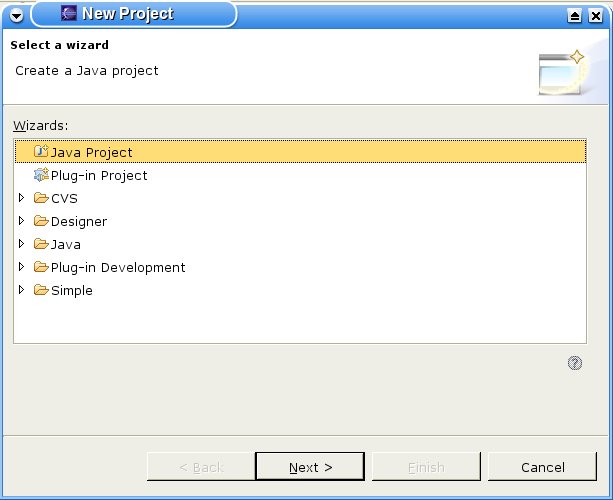
Under Eclipse terminology, all the different files needed for your program (such as Java files, images, data files etc) are all packaged together into a "project". So, the first step is to create a new project for the Java program. To do this, select "File > New > Project" from the main menu in Eclipse. This will bring up the following window:

This is asking you what type of project you want to create, as Eclipse supports many different types. For COMP205, we are only interested in creating "Java Projects", since we're writing stand-alone Java programs. So, select Java Project from the list and click on "Next". You're now asked to enter the project name. For this tutorial, just use "HelloWorldProject" as the project name. The other settings in the window can be left with their default values. At this point, you can continue to select more advanced features by clicking on "Next". However, we do not need these for this simple project (and you probably won't for the programs you write in COMP205), so simply click on "Finished". Eclipse will then ask if you want to open the "Java perspective". As this will enable various things designed for editing Java programs, you should say "Yes". After this, you should find yourself back in the workbench with the "HelloWorldProject" visible.
Like so:

We now have an empty project called "HelloWorldProject". The next thing to do is add the Java classes for our program. For this tutorial, we're only going to add one very simple class called "HelloWorld". This will contain the (public static) main method which will just print "Hello World" onto the screen and exit.
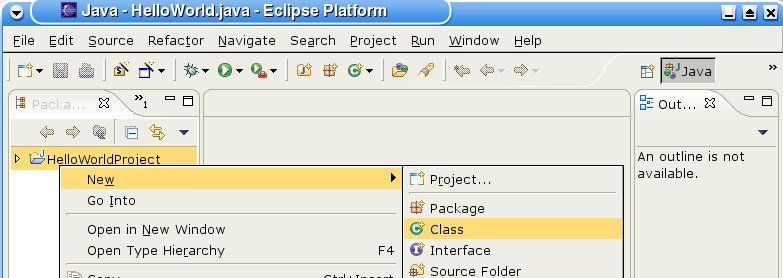
So, right click on the project name and select "New > Java Class". Like so:

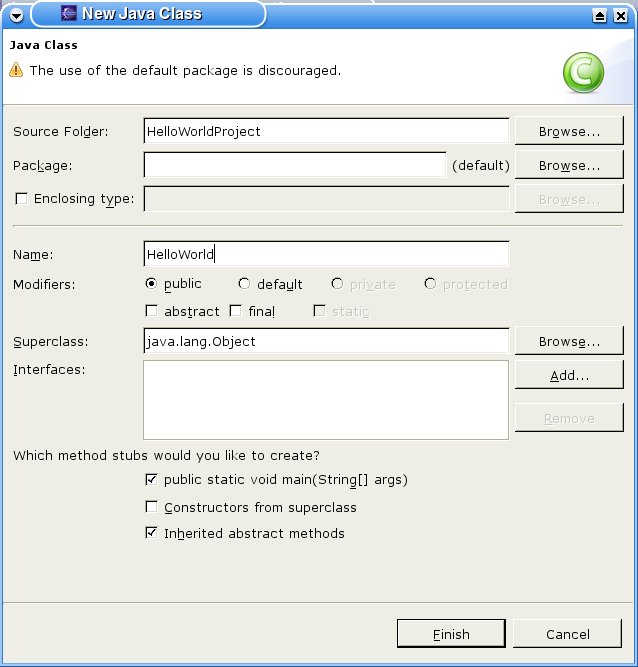
You now have to provide a few things so that Eclipse can create the class in the following window:

Here, there are four main things to look for. Firstly, at the top it says "Source Folder". This should
be the same as the project name (which is HelloWorldProject in our case). Below that there is a box called
"Package". You can think of a package as a sub-project inside your main project. Generally, you will group related classes into the same package. For simple projects, such as this one, we can just leave the package name empty and this selects the "default" package. Carrying on, we see that a few lines below "Package Name" in the above, we have "Name". In this box, you should enter the name of the class you want to create and, in the above, HelloWorld has been entered. The final point is that we want our HelloWorld class to
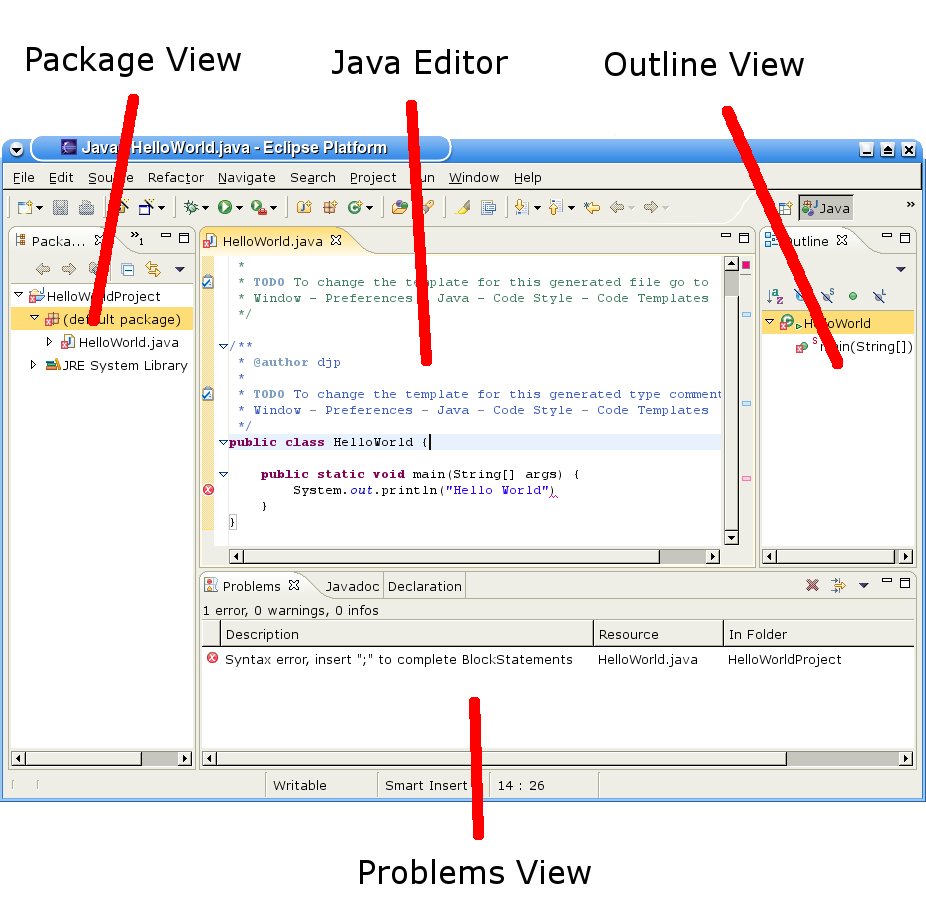
contain the (public static) main method. Therefore, we can ask Eclipse to put this function into our class by checking the corresponding item under "Which method stubs would you like to create?". Note, a "stub" is simply an empty function. So, our new class will now contain an empty main method. Having done all this, click on "Finished" and Eclipse will create a new class for you. The workbench now looks something like t
his:

The code for our simple program has been entered into the main method of our Java class. However, a slight typo was made - a semi-colon is missing after the println statement. The error is highlighted in the problems view, which states there is syntax error on line 17. Generally speaking, if you double click on an error like this, Eclipse will take to the right place straight away which is handy. Now, you should add the println statement to the main method in your HelloWorld class, remembering to add the semi-colon of course!
Eclipse uses a rather modern approach when it comes to compiling programs, known as incremental compilation. This means you don't ever need to tell Eclipse to compile your program. Instead, Eclipse will compile your program for you. This can happen at any time and you often might not notice it. In particular, Eclipse will normally compile a program when you save it or when you try and run it. So, save your program by
clicking on the disk icon in the main toolbar of Eclipse. You should notice that the problems tab is showing another error in the program. Looking at the error message, it says "The method println(String) is undefined for the type System". What this means is that the System object does not have a println(String) method. In fact, what we meant to write was "System.out.println("Hello World");". So, correct the program accordingly and save it again to check there are no more error messages. At this point you're ready to run your first Java program. See the tutorial on
Running Java Applications for more on how to do this.
Starting up | Running Programs | Debugging | Export to Jar | Advanced Debugging
-- djp - 09 Mar 2010
 This is asking you what type of project you want to create, as Eclipse supports many different types. For COMP205, we are only interested in creating "Java Projects", since we're writing stand-alone Java programs. So, select Java Project from the list and click on "Next". You're now asked to enter the project name. For this tutorial, just use "HelloWorldProject" as the project name. The other settings in the window can be left with their default values. At this point, you can continue to select more advanced features by clicking on "Next". However, we do not need these for this simple project (and you probably won't for the programs you write in COMP205), so simply click on "Finished". Eclipse will then ask if you want to open the "Java perspective". As this will enable various things designed for editing Java programs, you should say "Yes". After this, you should find yourself back in the workbench with the "HelloWorldProject" visible.
Like so:
 We now have an empty project called "HelloWorldProject". The next thing to do is add the Java classes for our program. For this tutorial, we're only going to add one very simple class called "HelloWorld". This will contain the (public static) main method which will just print "Hello World" onto the screen and exit.
So, right click on the project name and select "New > Java Class". Like so:
 You now have to provide a few things so that Eclipse can create the class in the following window:
 Here, there are four main things to look for. Firstly, at the top it says "Source Folder". This should
be the same as the project name (which is HelloWorldProject in our case). Below that there is a box called
"Package". You can think of a package as a sub-project inside your main project. Generally, you will group related classes into the same package. For simple projects, such as this one, we can just leave the package name empty and this selects the "default" package. Carrying on, we see that a few lines below "Package Name" in the above, we have "Name". In this box, you should enter the name of the class you want to create and, in the above, HelloWorld has been entered. The final point is that we want our HelloWorld class to
contain the (public static) main method. Therefore, we can ask Eclipse to put this function into our class by checking the corresponding item under "Which method stubs would you like to create?". Note, a "stub" is simply an empty function. So, our new class will now contain an empty main method. Having done all this, click on "Finished" and Eclipse will create a new class for you. The workbench now looks something like t
his:
 The code for our simple program has been entered into the main method of our Java class. However, a slight typo was made - a semi-colon is missing after the println statement. The error is highlighted in the problems view, which states there is syntax error on line 17. Generally speaking, if you double click on an error like this, Eclipse will take to the right place straight away which is handy. Now, you should add the println statement to the main method in your HelloWorld class, remembering to add the semi-colon of course!
Eclipse uses a rather modern approach when it comes to compiling programs, known as incremental compilation. This means you don't ever need to tell Eclipse to compile your program. Instead, Eclipse will compile your program for you. This can happen at any time and you often might not notice it. In particular, Eclipse will normally compile a program when you save it or when you try and run it. So, save your program by
clicking on the disk icon in the main toolbar of Eclipse. You should notice that the problems tab is showing another error in the program. Looking at the error message, it says "The method println(String) is undefined for the type System". What this means is that the System object does not have a println(String) method. In fact, what we meant to write was "System.out.println("Hello World");". So, correct the program accordingly and save it again to check there are no more error messages. At this point you're ready to run your first Java program. See the tutorial on Running Java Applications for more on how to do this.
