Tutorial - Eclipse: Running Programs
Running Java Programs under Eclipse
This tutorial walks you through the process of running a Java program for the first time. It assumes that you have just completed the
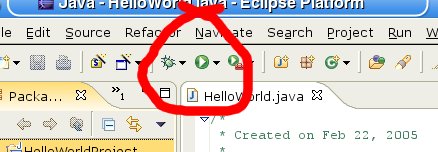
Hello World tutorial and are ready to run the HelloWorld program. So, start by clicking on the green play button in the main Eclipse toolbar. A red circle has been drawn around this to highlight it in the below:

After clicking on this the
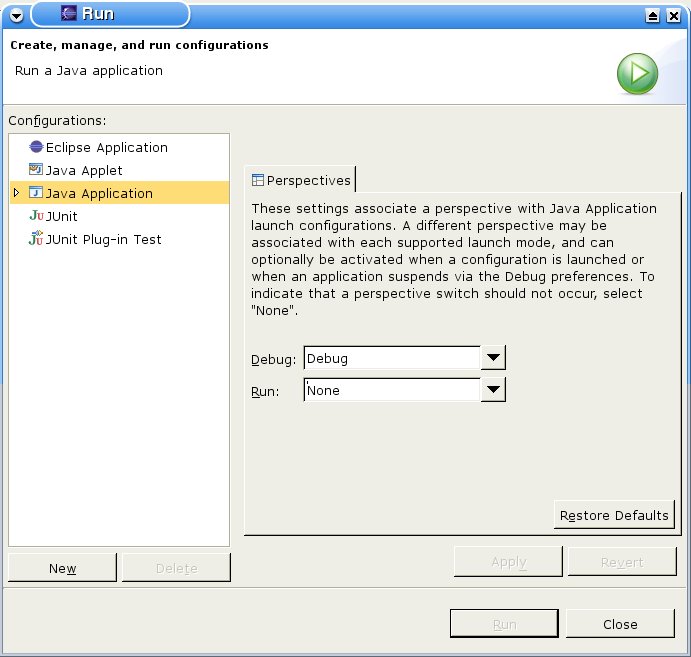
launch configuration window will come up. The launch configuration window looks like:

The idea of launch configurations is that you specify how to run your application, so that Eclipse knows this for the future. In fact, you can specify several different configurations, each of which runs your program in a different way (possibly using different Java Runtime Environments).
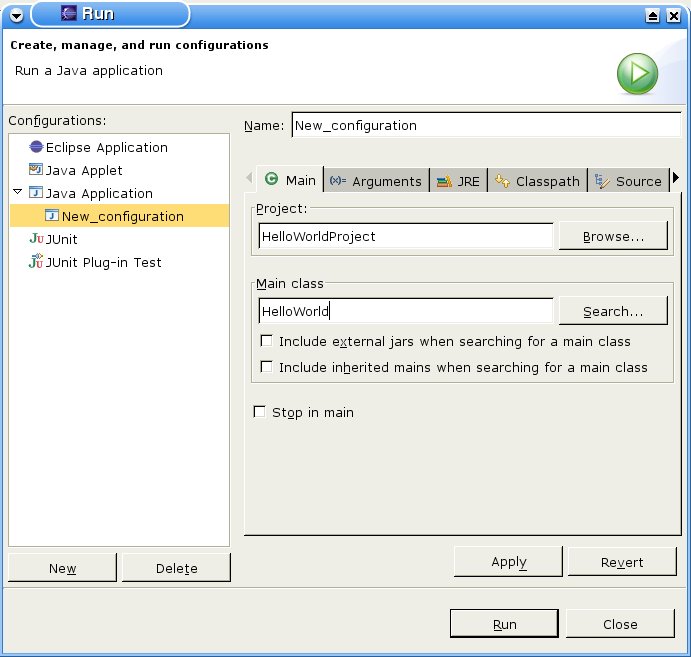
The first thing to do is to create a new launch configuration. As your program is a stand-alone Java program, you should select "Java Application", as we have done above. Then simply click on "New" and a new configuration will be created. To use the new configuration, you must first tell Eclipse which class contains the main method, by entering its name into the "Main Class" field. Like so:

You can now run your program by clicking "Run". And, from now on, whenever you click on the green play
button in the Eclipse toolbar, this configuration will be used. To see the output from your program, select the console tab in the tasks view:

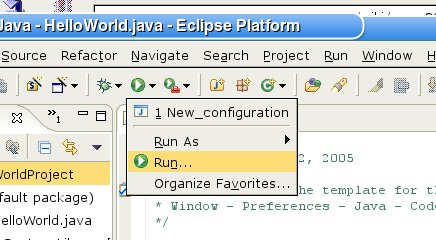
Finally, it often arises when running programs that you need to pass command-line parameters to the application. To do this, you need to bring up the lanuch window again, by clicking on the "drop-down" part of the green play button and selecting "Run":

You can now add the command-line arguments using the "Arguments" tab of the launch configuration.
Starting up | Hello World | Debugging | Export to Jar | Advanced Debugging
 After clicking on this the launch configuration window will come up. The launch configuration window looks like:
 The idea of launch configurations is that you specify how to run your application, so that Eclipse knows this for the future. In fact, you can specify several different configurations, each of which runs your program in a different way (possibly using different Java Runtime Environments).
The first thing to do is to create a new launch configuration. As your program is a stand-alone Java program, you should select "Java Application", as we have done above. Then simply click on "New" and a new configuration will be created. To use the new configuration, you must first tell Eclipse which class contains the main method, by entering its name into the "Main Class" field. Like so:
 You can now run your program by clicking "Run". And, from now on, whenever you click on the green play
button in the Eclipse toolbar, this configuration will be used. To see the output from your program, select the console tab in the tasks view:
 Finally, it often arises when running programs that you need to pass command-line parameters to the application. To do this, you need to bring up the lanuch window again, by clicking on the "drop-down" part of the green play button and selecting "Run":
 You can now add the command-line arguments using the "Arguments" tab of the launch configuration.
